Getting started with Explorer Alerts
Overview
Alli Explorer Alerts provides you and your team a way to receive customized messages about the data that is most important to your business. Leveraging your defined data logic and scheduling, Alli will send you messages through Slack or Email.

Before Getting Started
Prior to setting up a new Explorer Alert, ensure that:
You have a Slack Workspace (if you plan to use Slack) enabled for your Alli client: How-to Add A New Slack Workspace to send alerts to
You have a datasource that will inform your Explorer Alert: How to Create a new datasource
Alli Certified Datasources are a great way to get started: Explorer Overview | Alli-Certified-Datasources
Navigating To Explorer Alerts
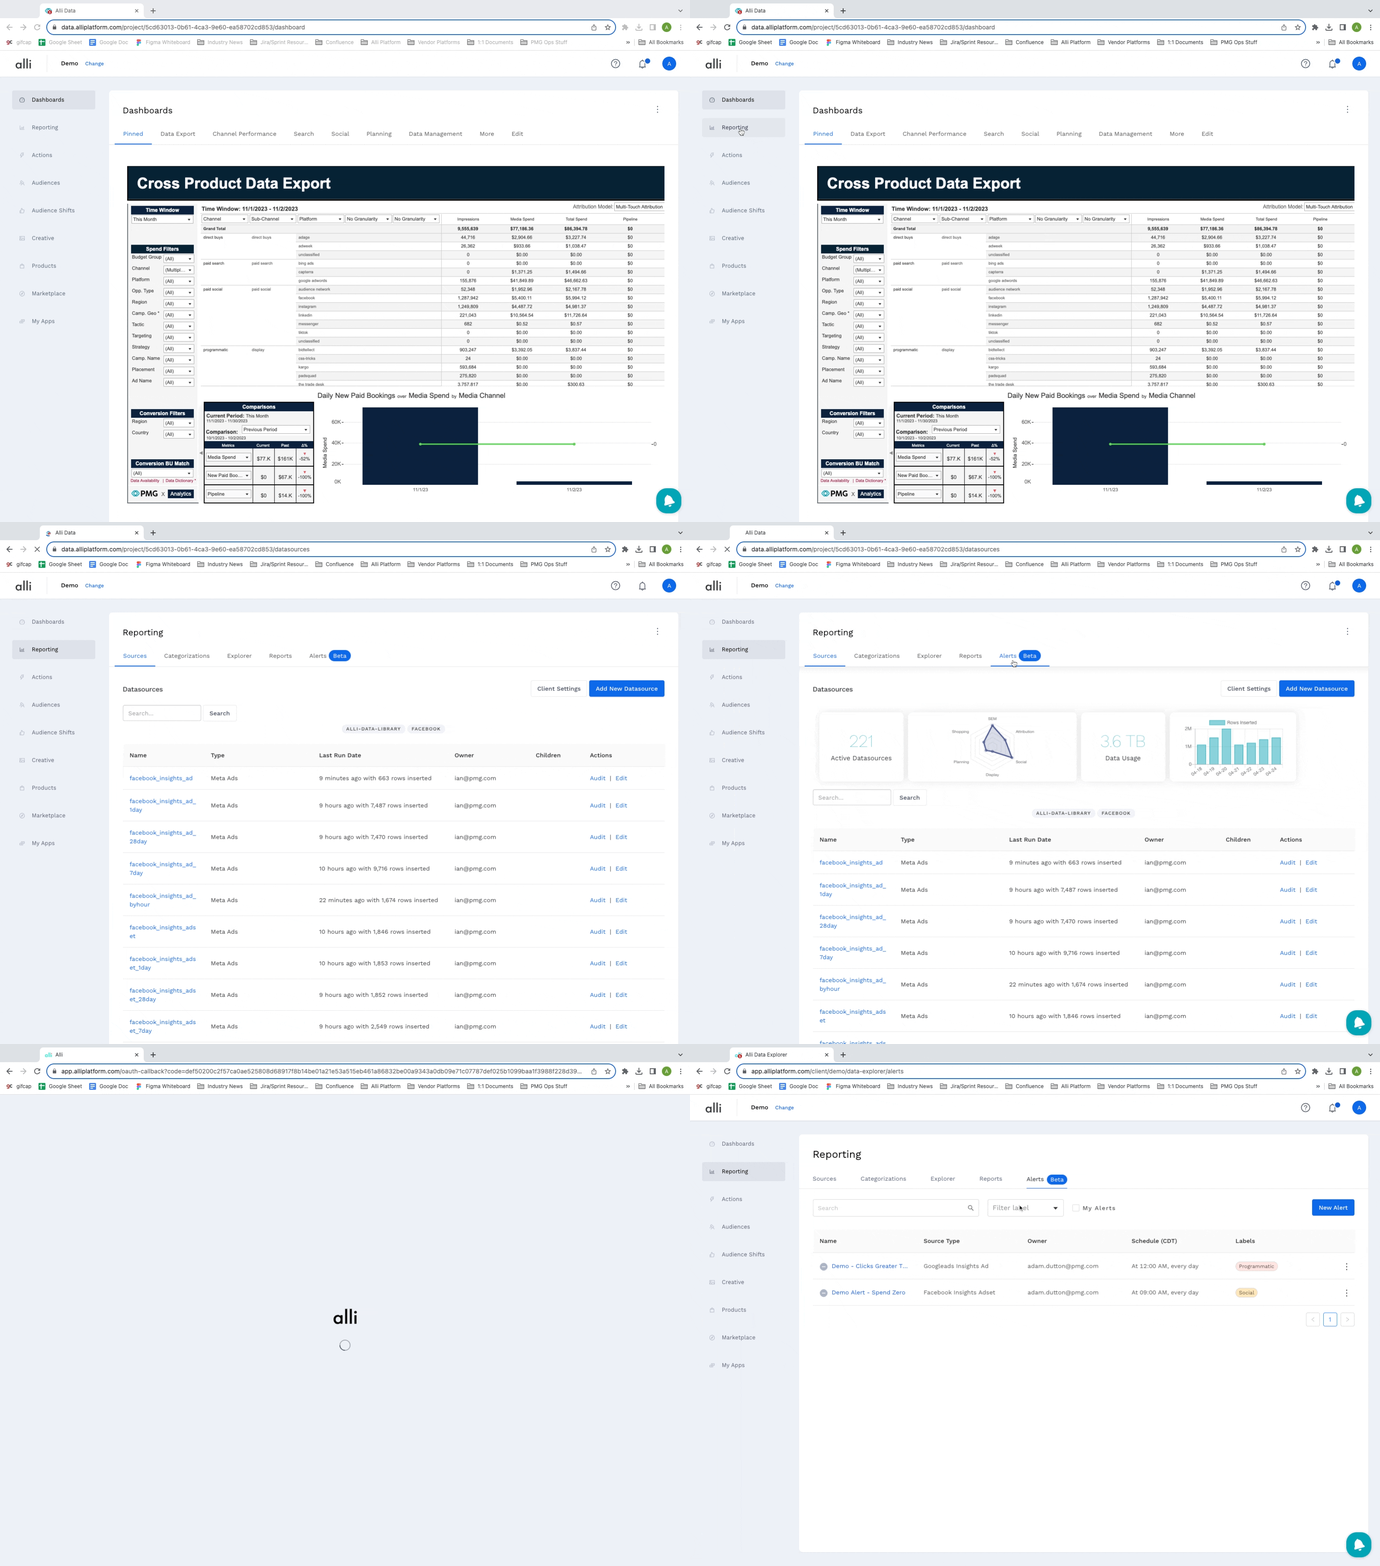
To get started with Explorer Alerts within your Alli client, navigate to Reporting on the side navigation menu. Within the Alli Reporting application, navigate to Alerts on the sub-navigation menu. This page will list all the Alerts that have been set up for your client. Here you can search for existing Alerts, filter existing Alerts by Labels, and see the current status of an Alert.
Set Up A New Explorer Alert
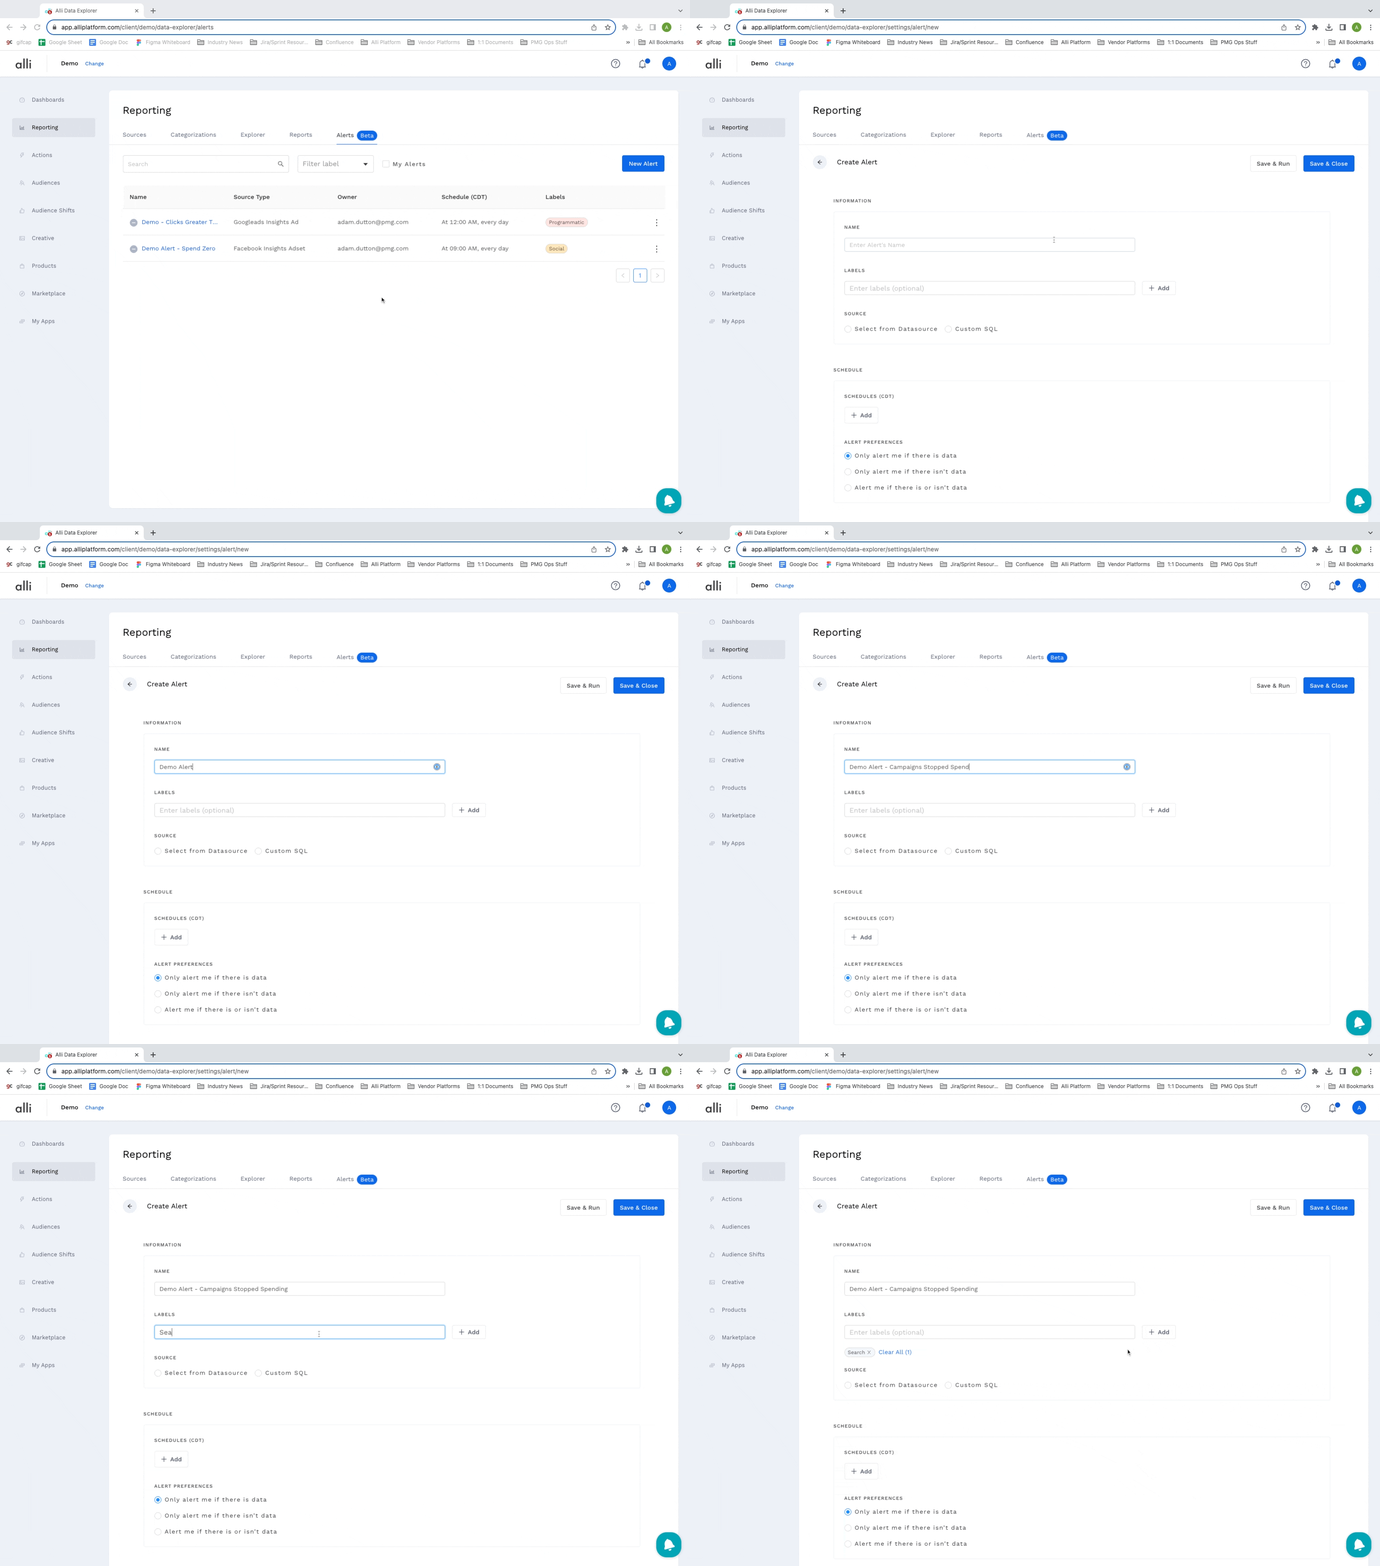
To create a new Alert, click the New Alert button in the upper right. This will land you on the Alert configuration page which contains all the details about an Alert. Start by adding a Name, which informs what this Alert is doing. Next, add any number of Labels that will further contextualize who or what this Alert is for.
Set Up Your Alert Data Logic
Next, you will apply the logic for the data that will be sent with your message. This can be done one of two ways:
No-SQL Report Builder
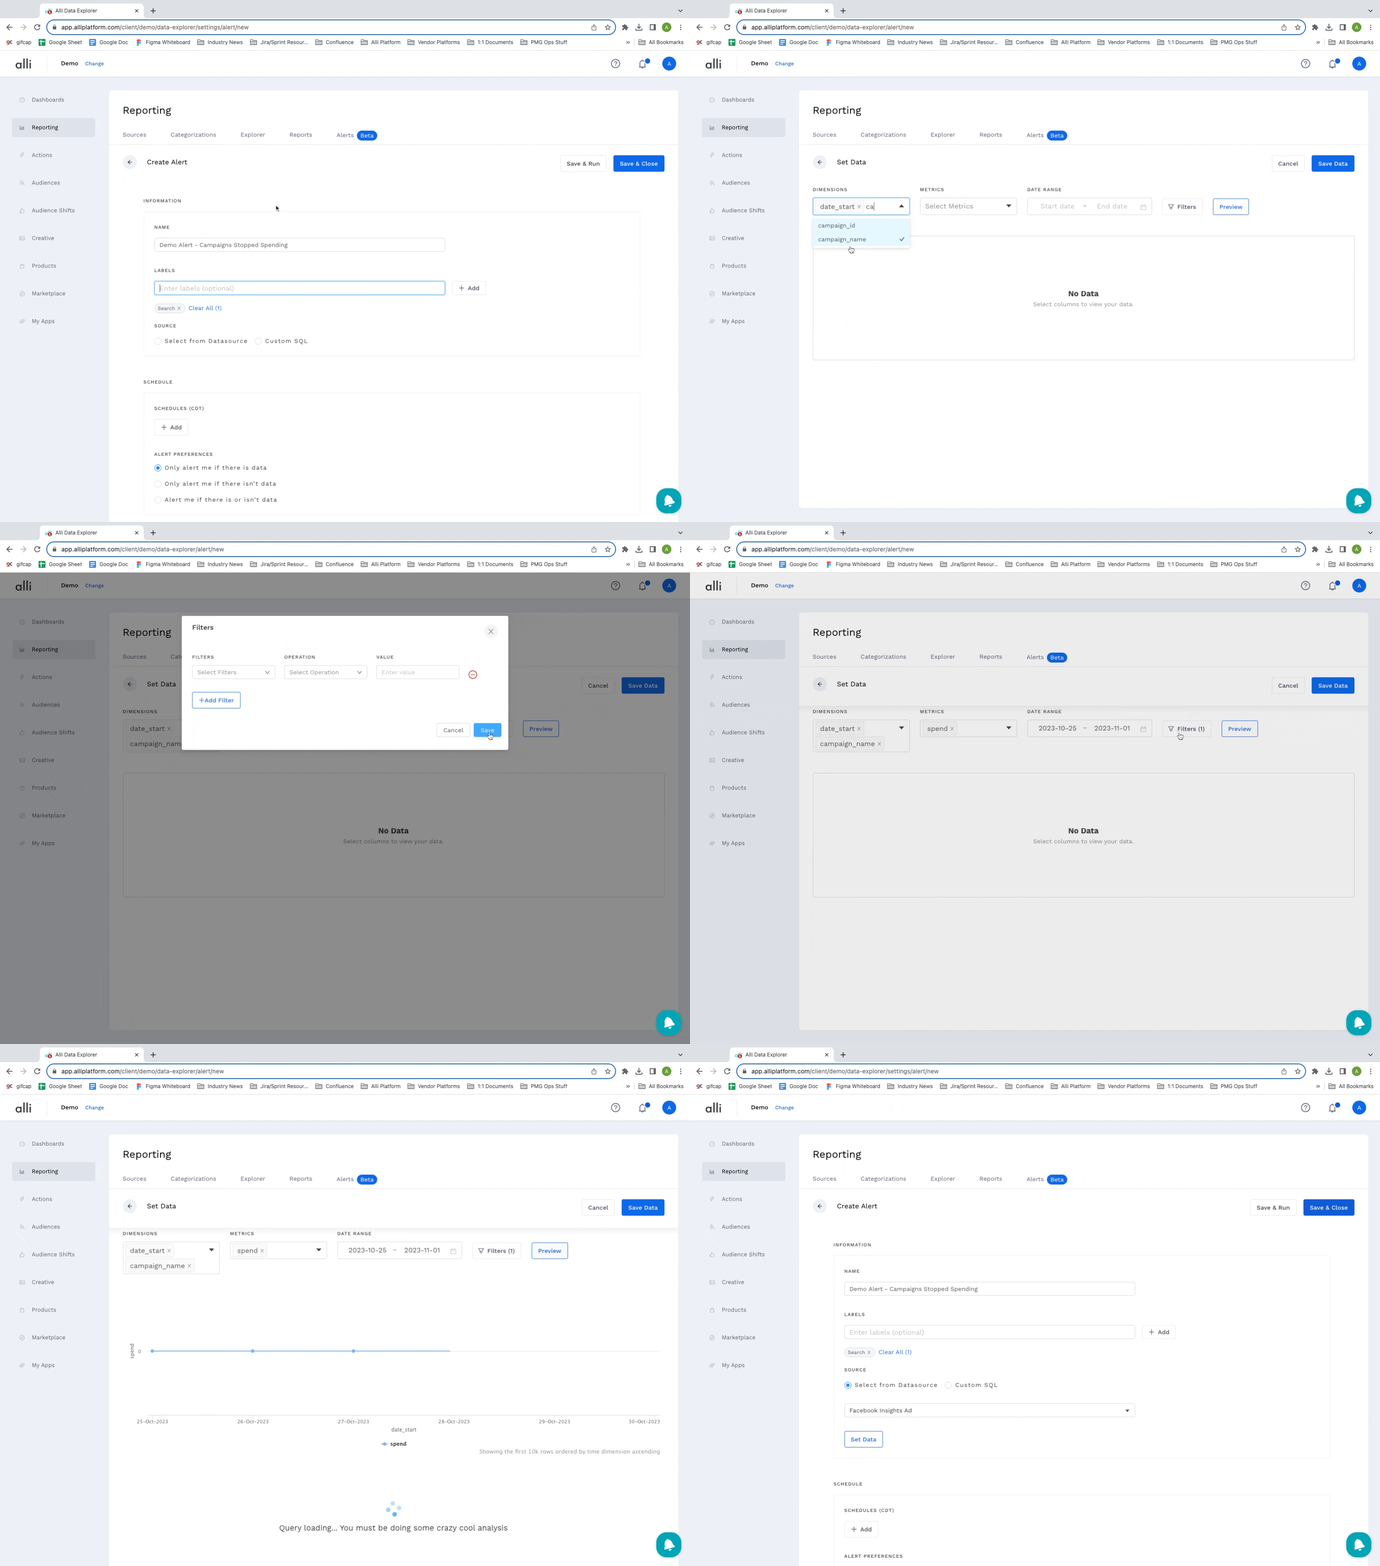
The first option is to leverage the No-SQL Report Builder by clicking Select from Datasource and searching for your previously created datasource. Once you find your datasource, click Set Data. This will lead you to the Report Builder page. Here you can select the columns (Dimensions and Metrics) you want included in your Alert, specify a Date Range for your data, and apply any Filter criteria to narrow down your data. Next, click the Preview button to see an example of your data results and make any further edits you may want. Once you are satisfied with your data logic, click Save Data to continue the Alert setup.
Custom SQL
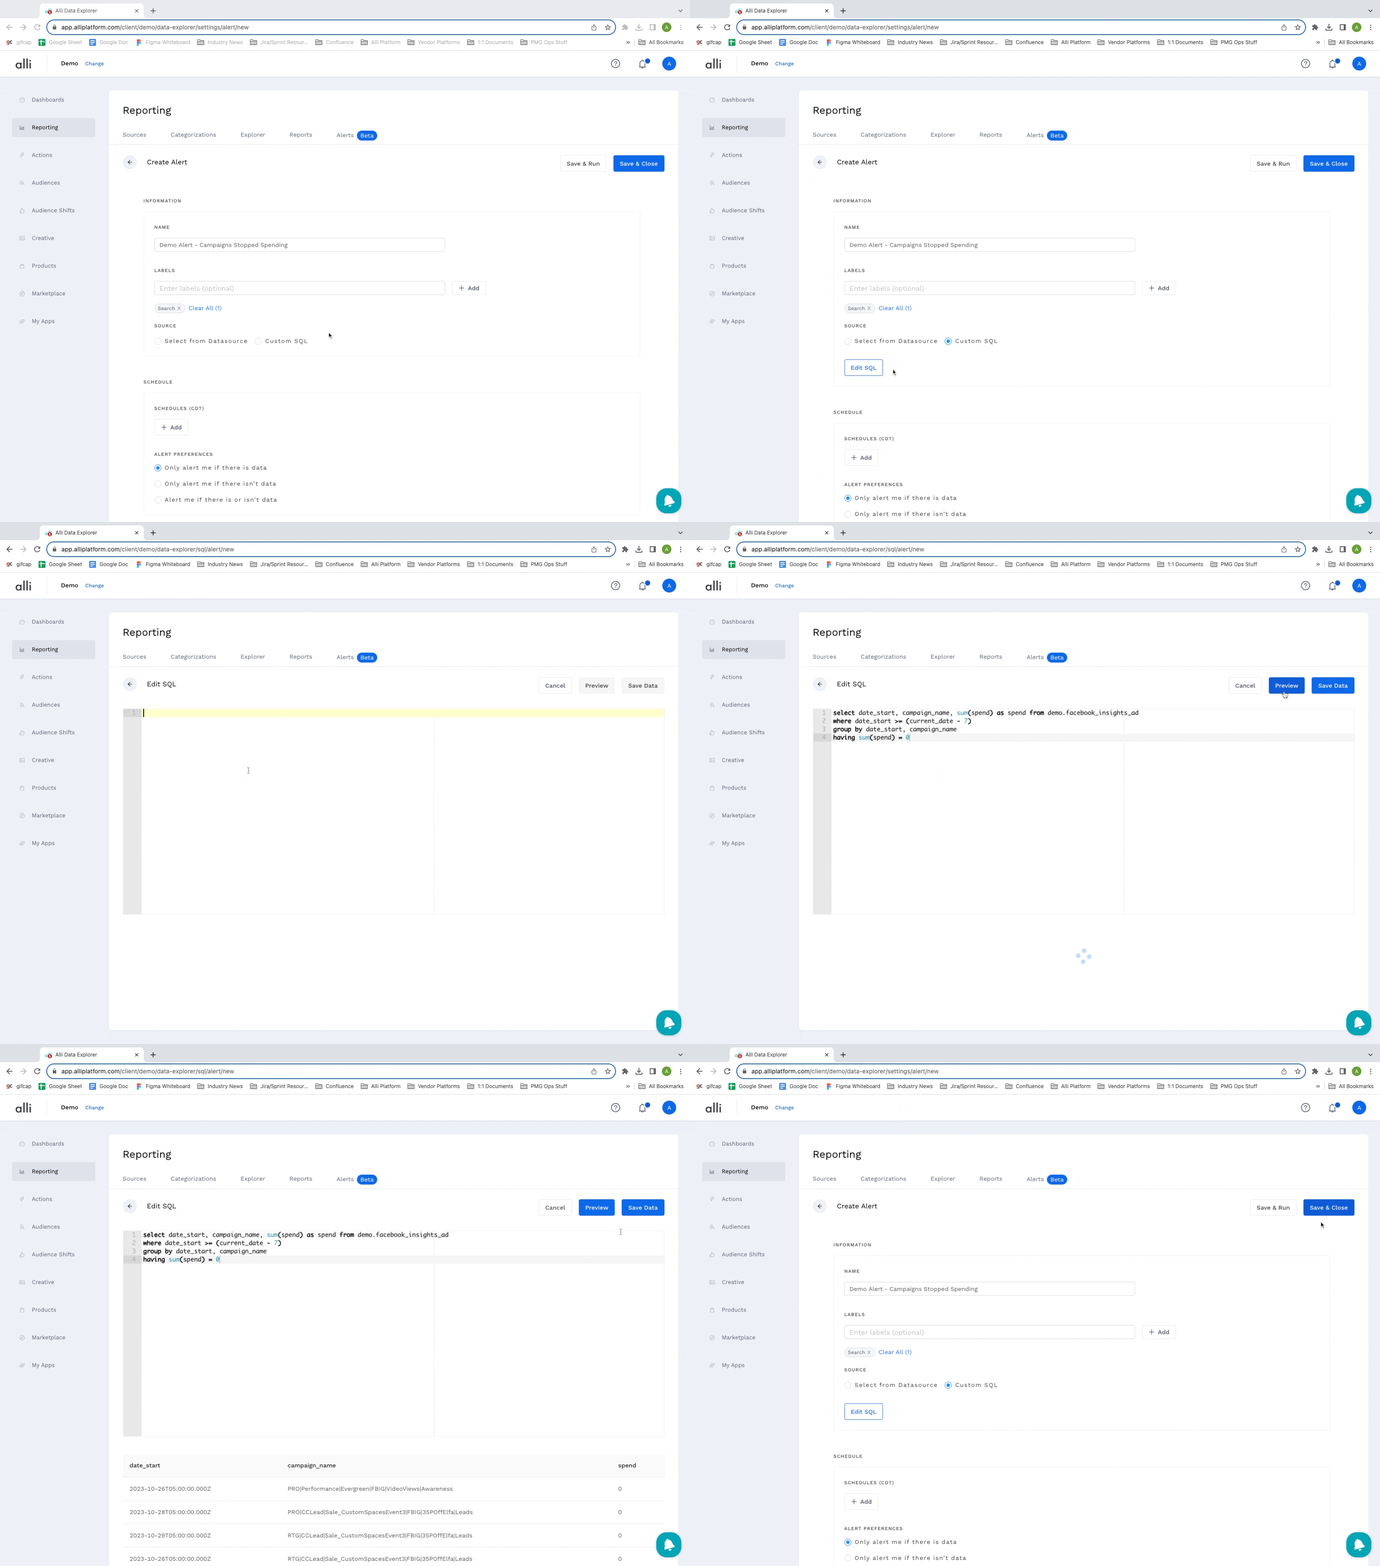
The second option is to leverage Custom SQL by clicking Custom SQL and then Edit SQL. This will lead you to the Custom SQL editor page. Here you can add your custom SQL query for the data you want included in your Alert. Next, click the Preview button to see an example of your data results and make any further edits you may want. Once you are satisfied with your data logic, click Save Data to continue the Alert setup.
Set Up Your Alert Schedule
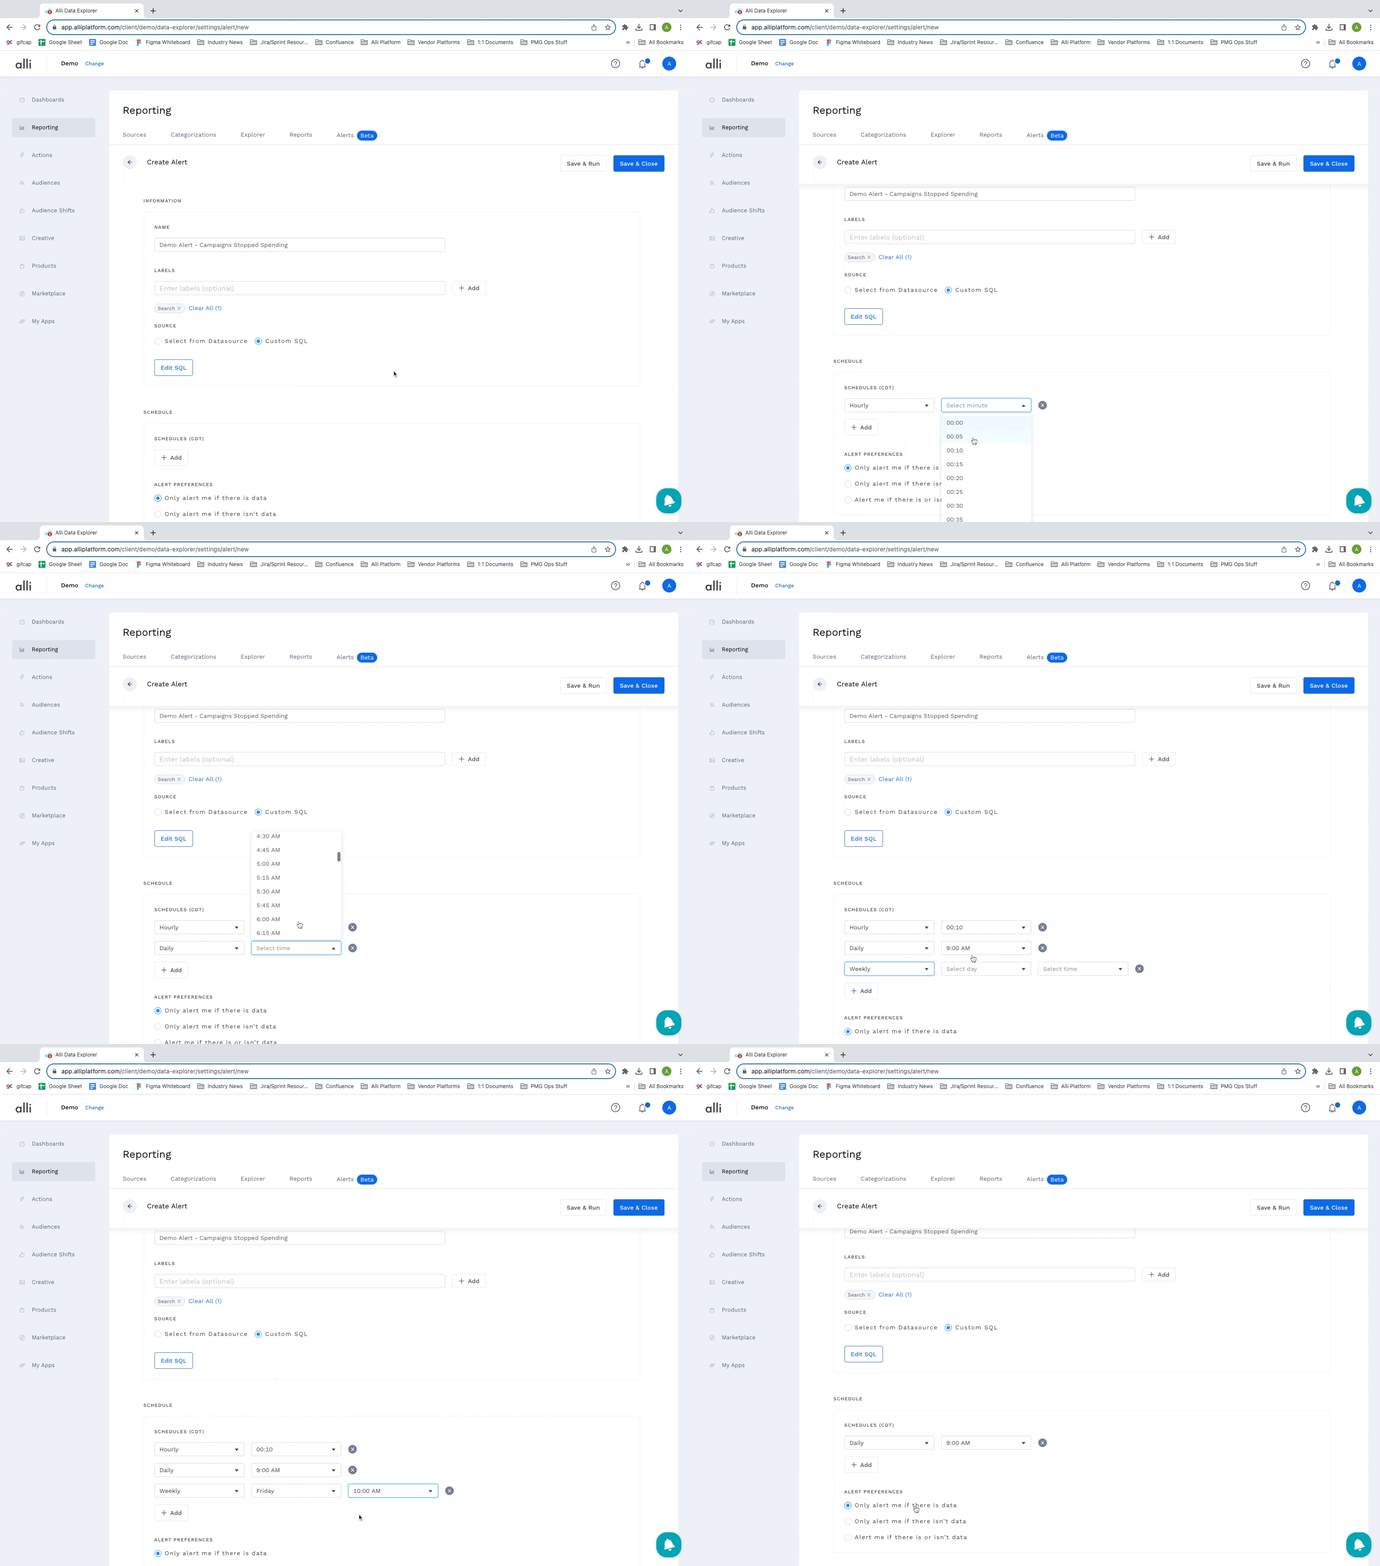
Next, you will apply a schedule that will define when and how often you want this Alert to run. These options include: Hourly, Daily, Weekly, Weekdays Only, Weekends Only, and Monthly. You can choose any variety of schedule that fits your needs. Next, select your Alert Preference which determines if you want to receive an Alert only if there is data, only if there isn’t data, or regardless if there is or isn’t data.
Set Up Your Alert Communication
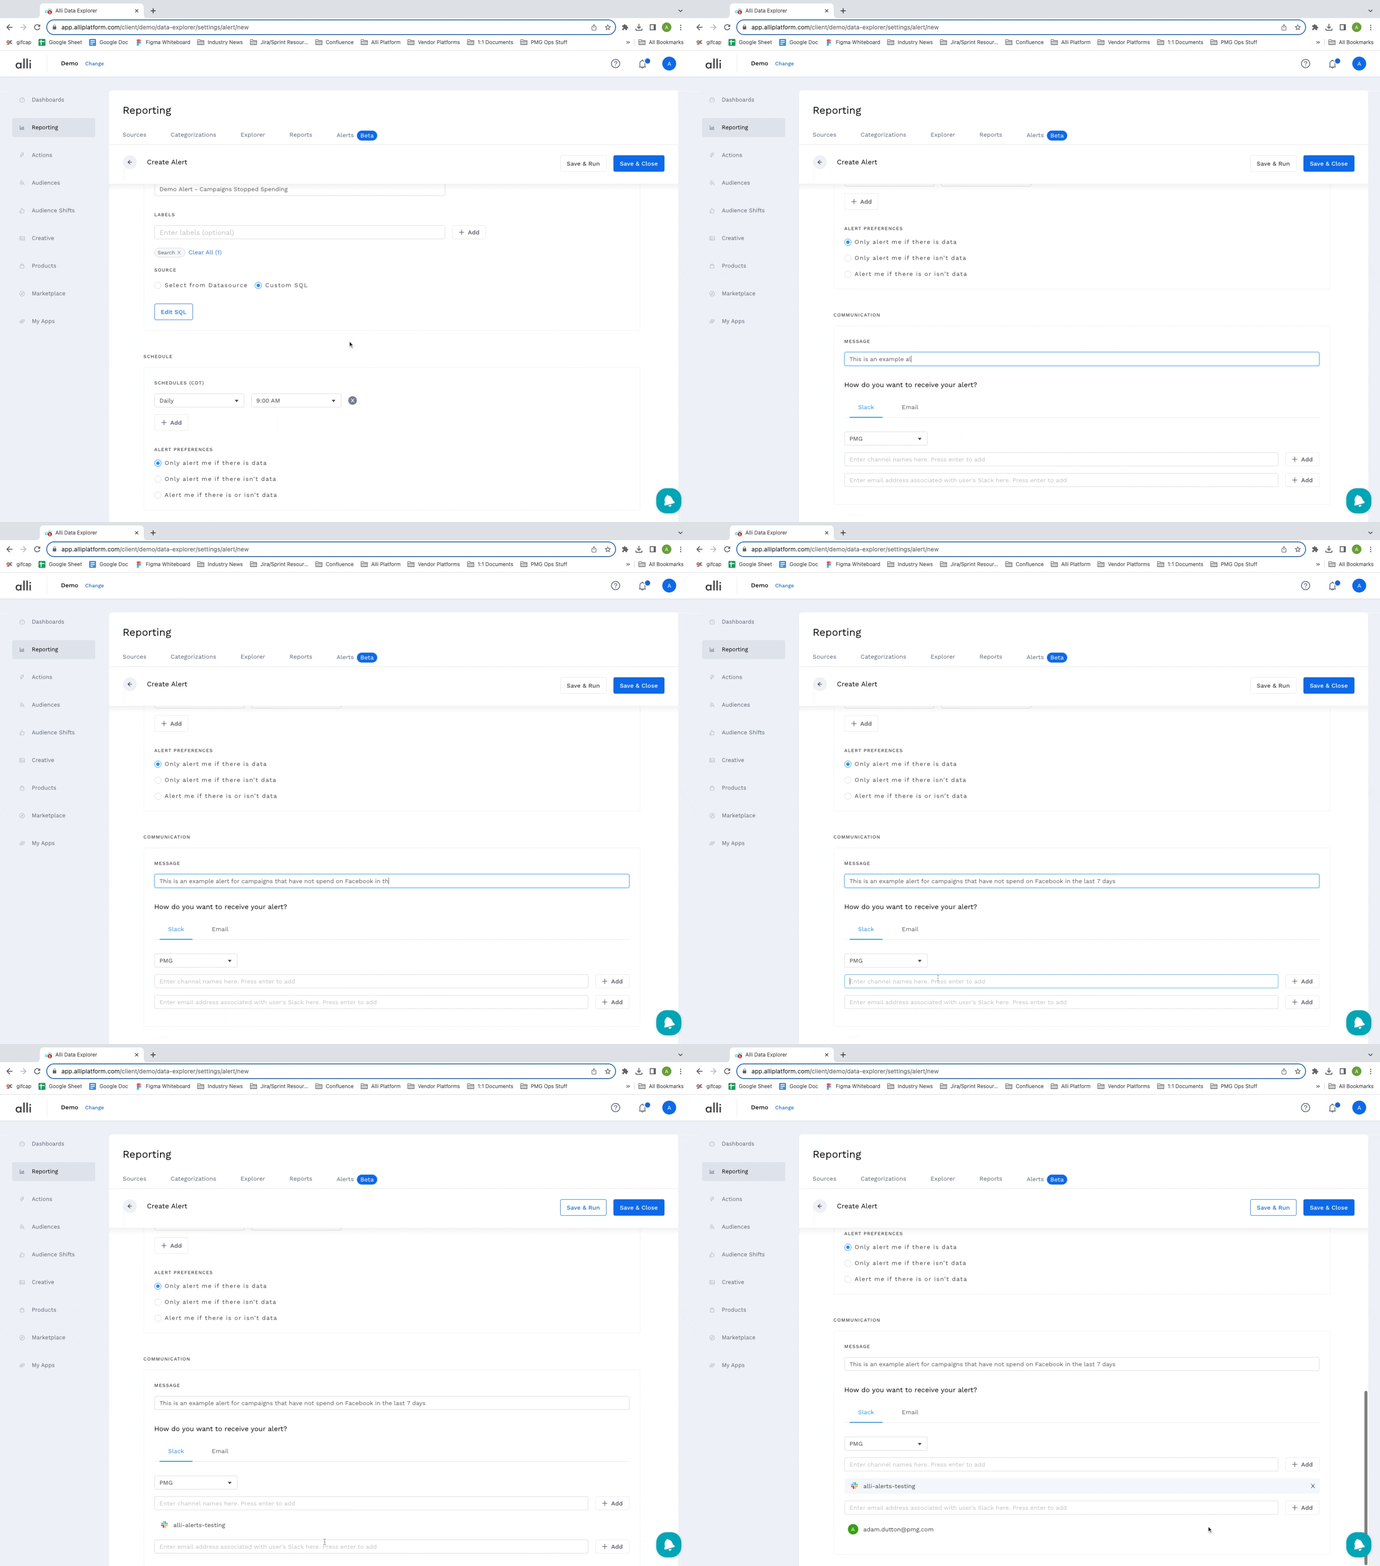
The last step is determining what you want your Alert to say and where you want your Alert to be sent, Slack or Email. Before setting your Slack or Email destination, input a message that will inform what action is to be taken.
Slack
To send to Slack, first select the Slack Workspace from the drop-down menu which will include any Workspace you have set up for your Alli client. Next, add your Slack Channel. Once the Slack Channel is inputted, Alli will verify that the Slack Channel exists in your selected Workspace. Optionally, if you would like to tag specific Slack Users, add the email(s) associated with the Slack User.
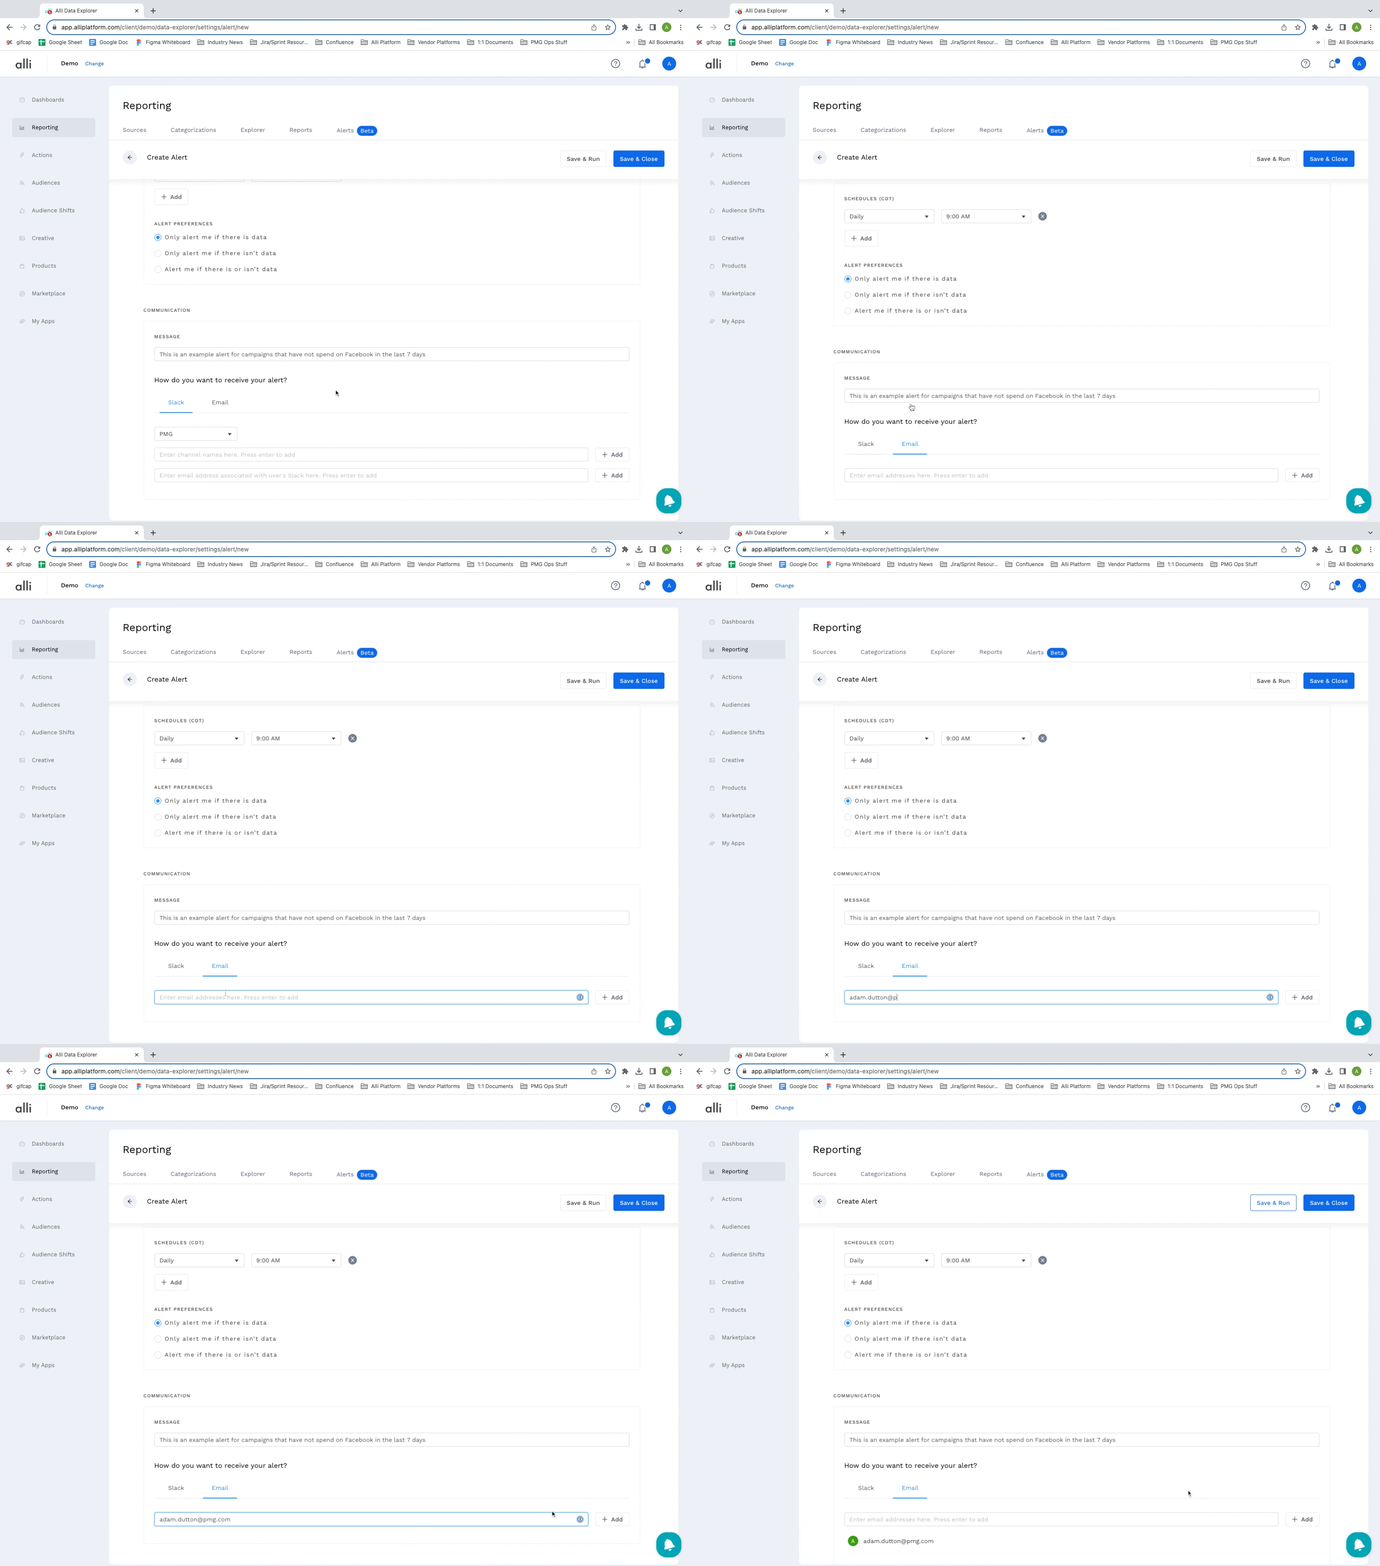
To send to Email, add the email(s) for where you want the Alert sent.
Saving And Activating Your Alert
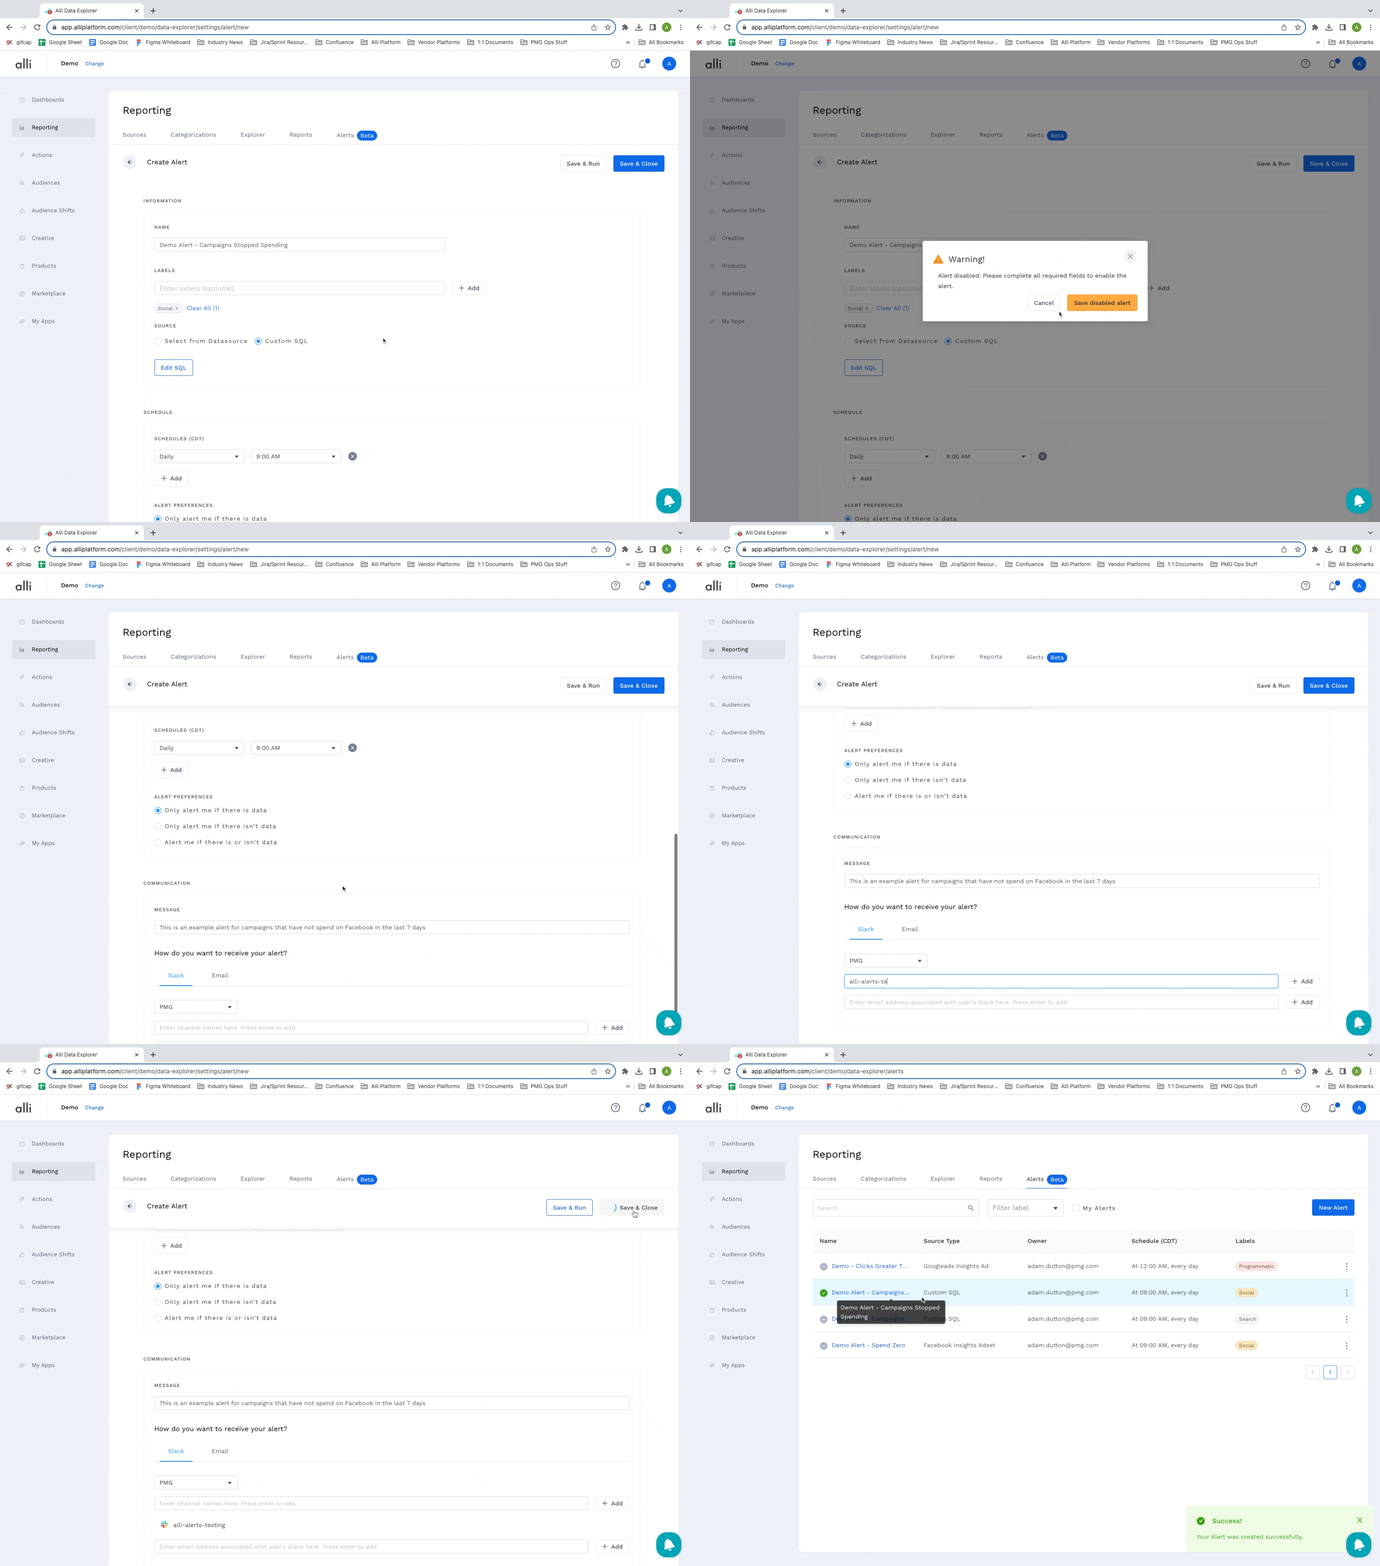
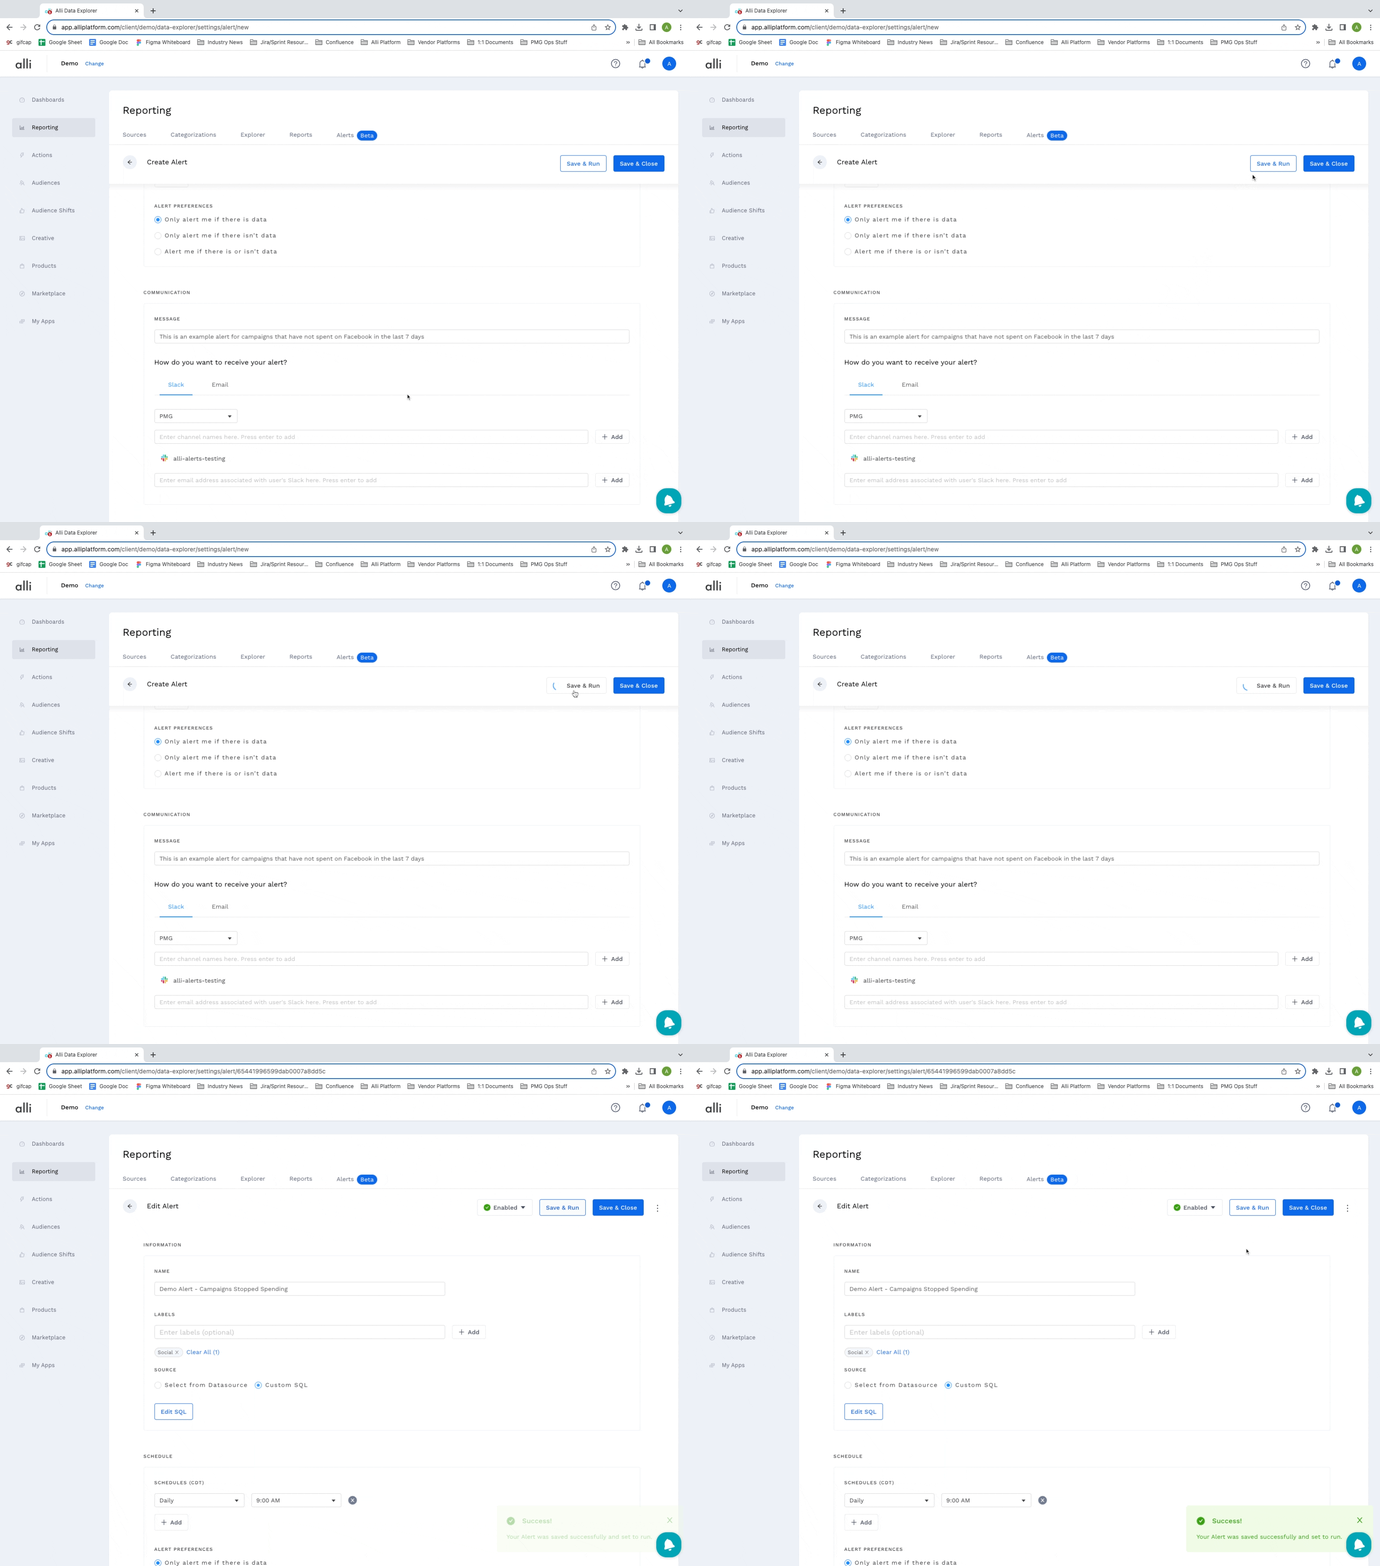
Once you complete your setup, click the Save & Close button. If all required fields are filled out, the Alert will be enabled and ready to go. If not all required fields are filled out, you will have to option to save in a disabled state for you to come back later and finish set up or you can continue editing to complete the required fields.
Testing Your Alert
If you would like to test your Alert once you’ve set it up, navigate to the setup page for your Alert and click Save & Run. This will execute your Alert and based on your set preferences, will send the Alert to your configured destination.
View Past Alert Executions
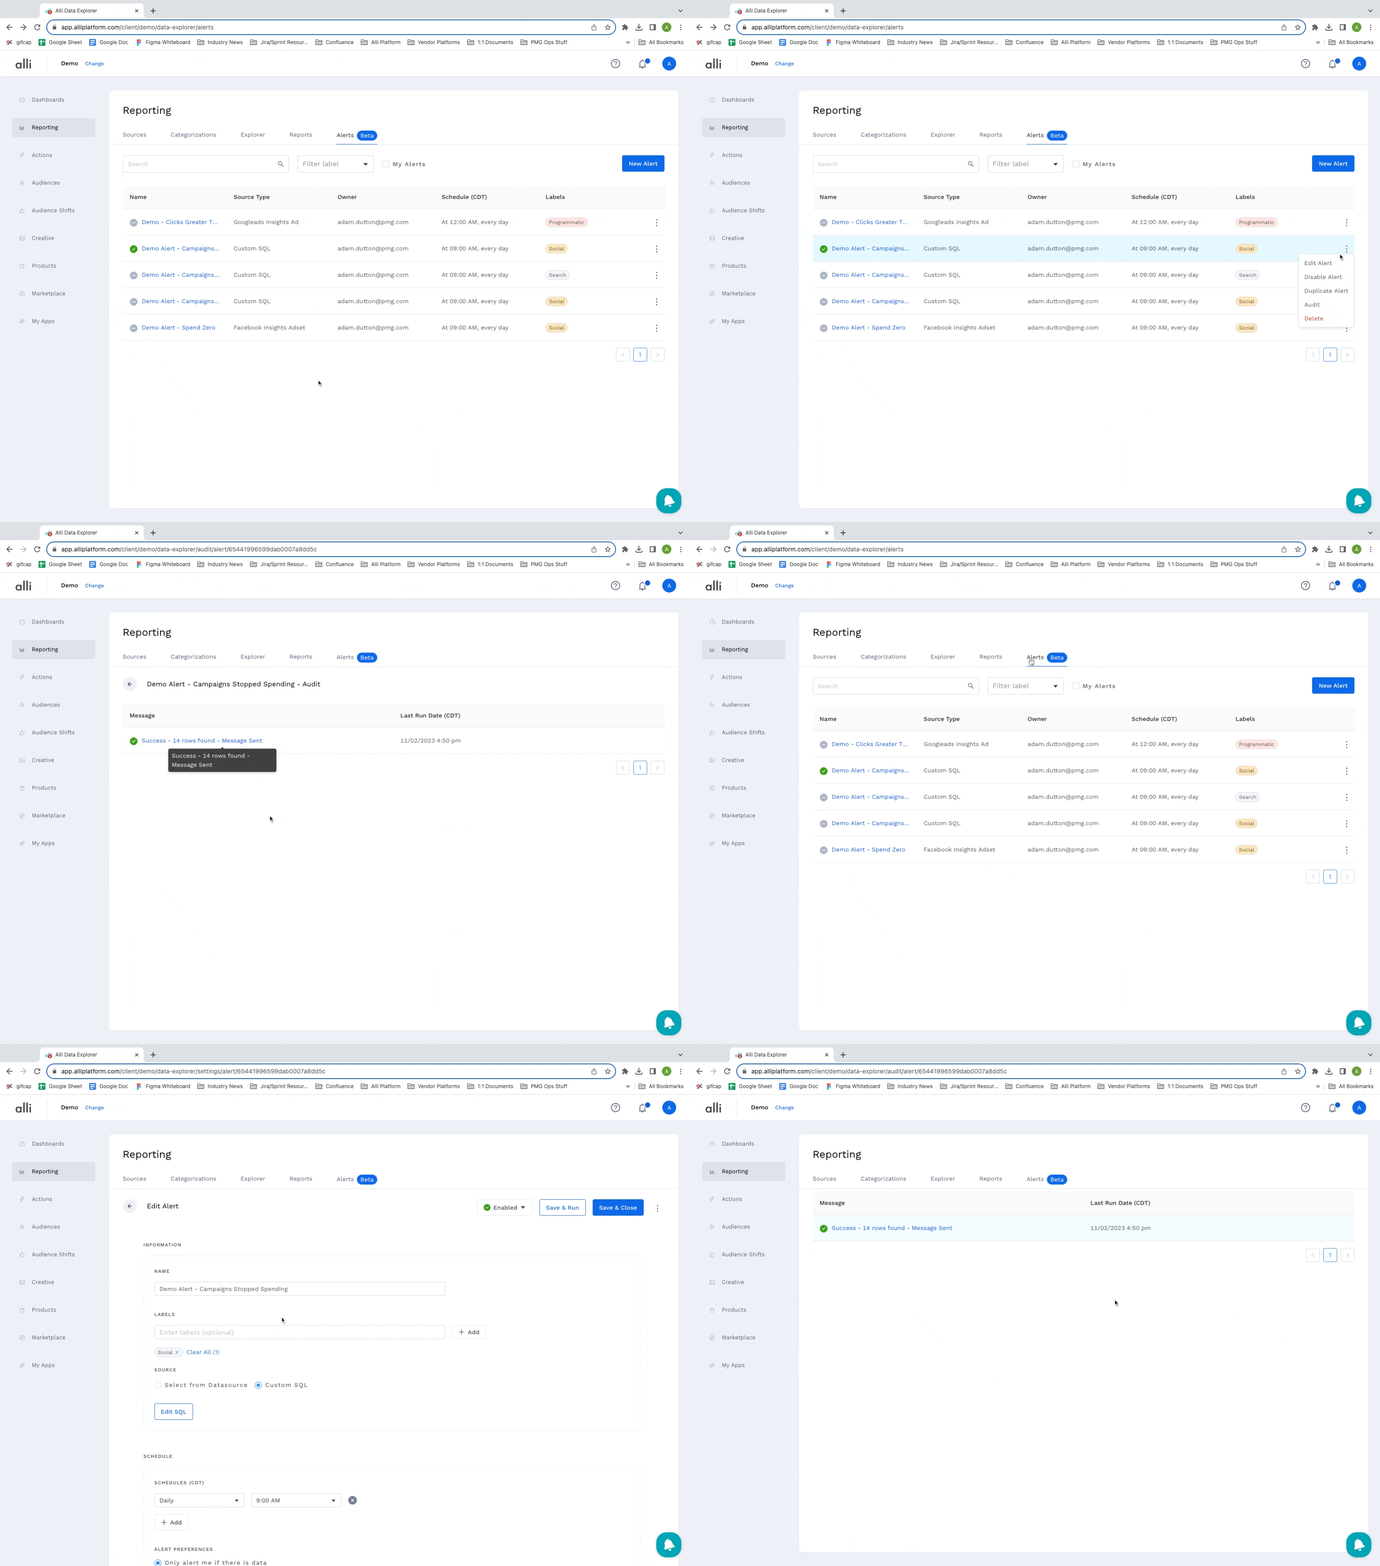
To look at the execution history of your Alert, click the three-dot menu and select Audit. This will lead you to the Audit page that showcases all previous executions, their status, and if there was a failure, the error associated.
Duplicating An Existing Alert
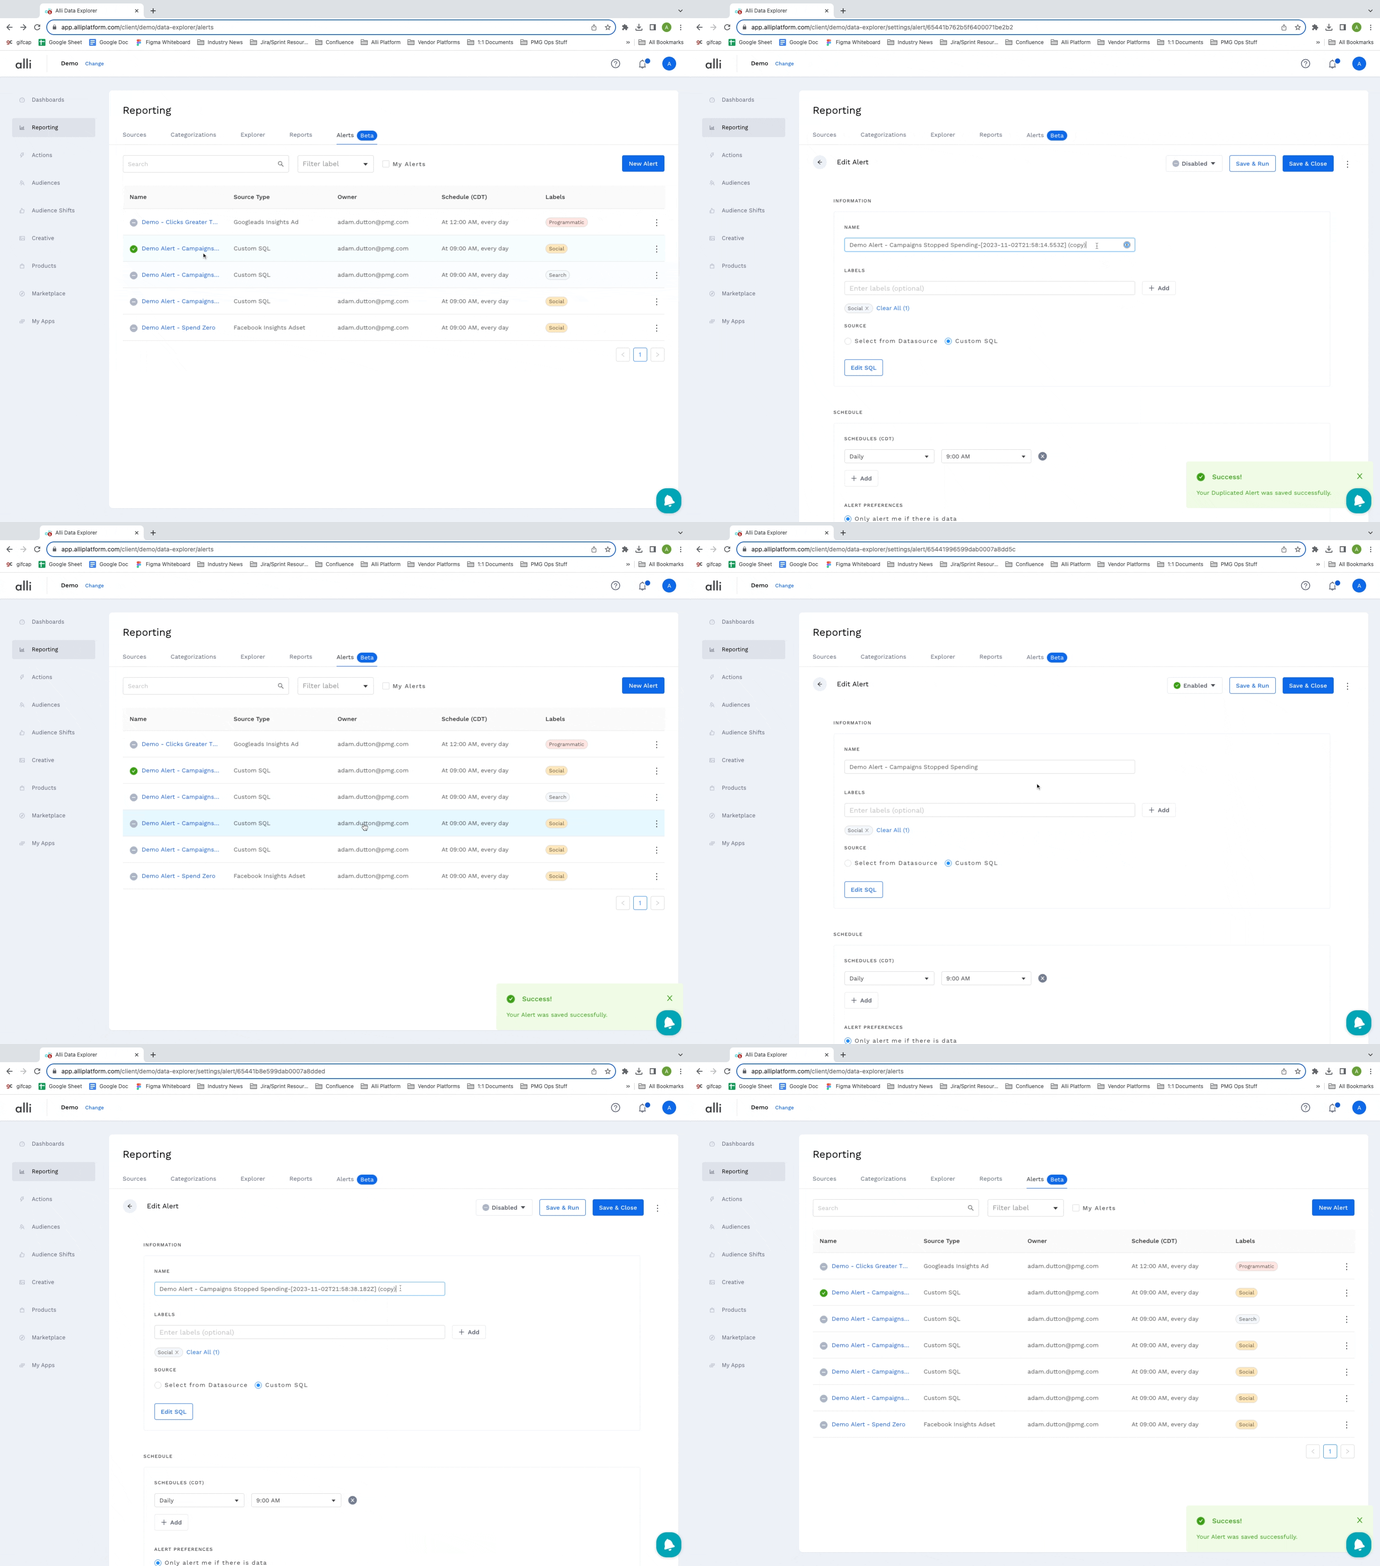
To duplicate an existing Alert, click the three-dot menu and select Duplicate. This will copy the contents of your existing Alert into a new Alert. Here you can make any adjustments needed and save as a new Alert.
Creating An Alert From A Report
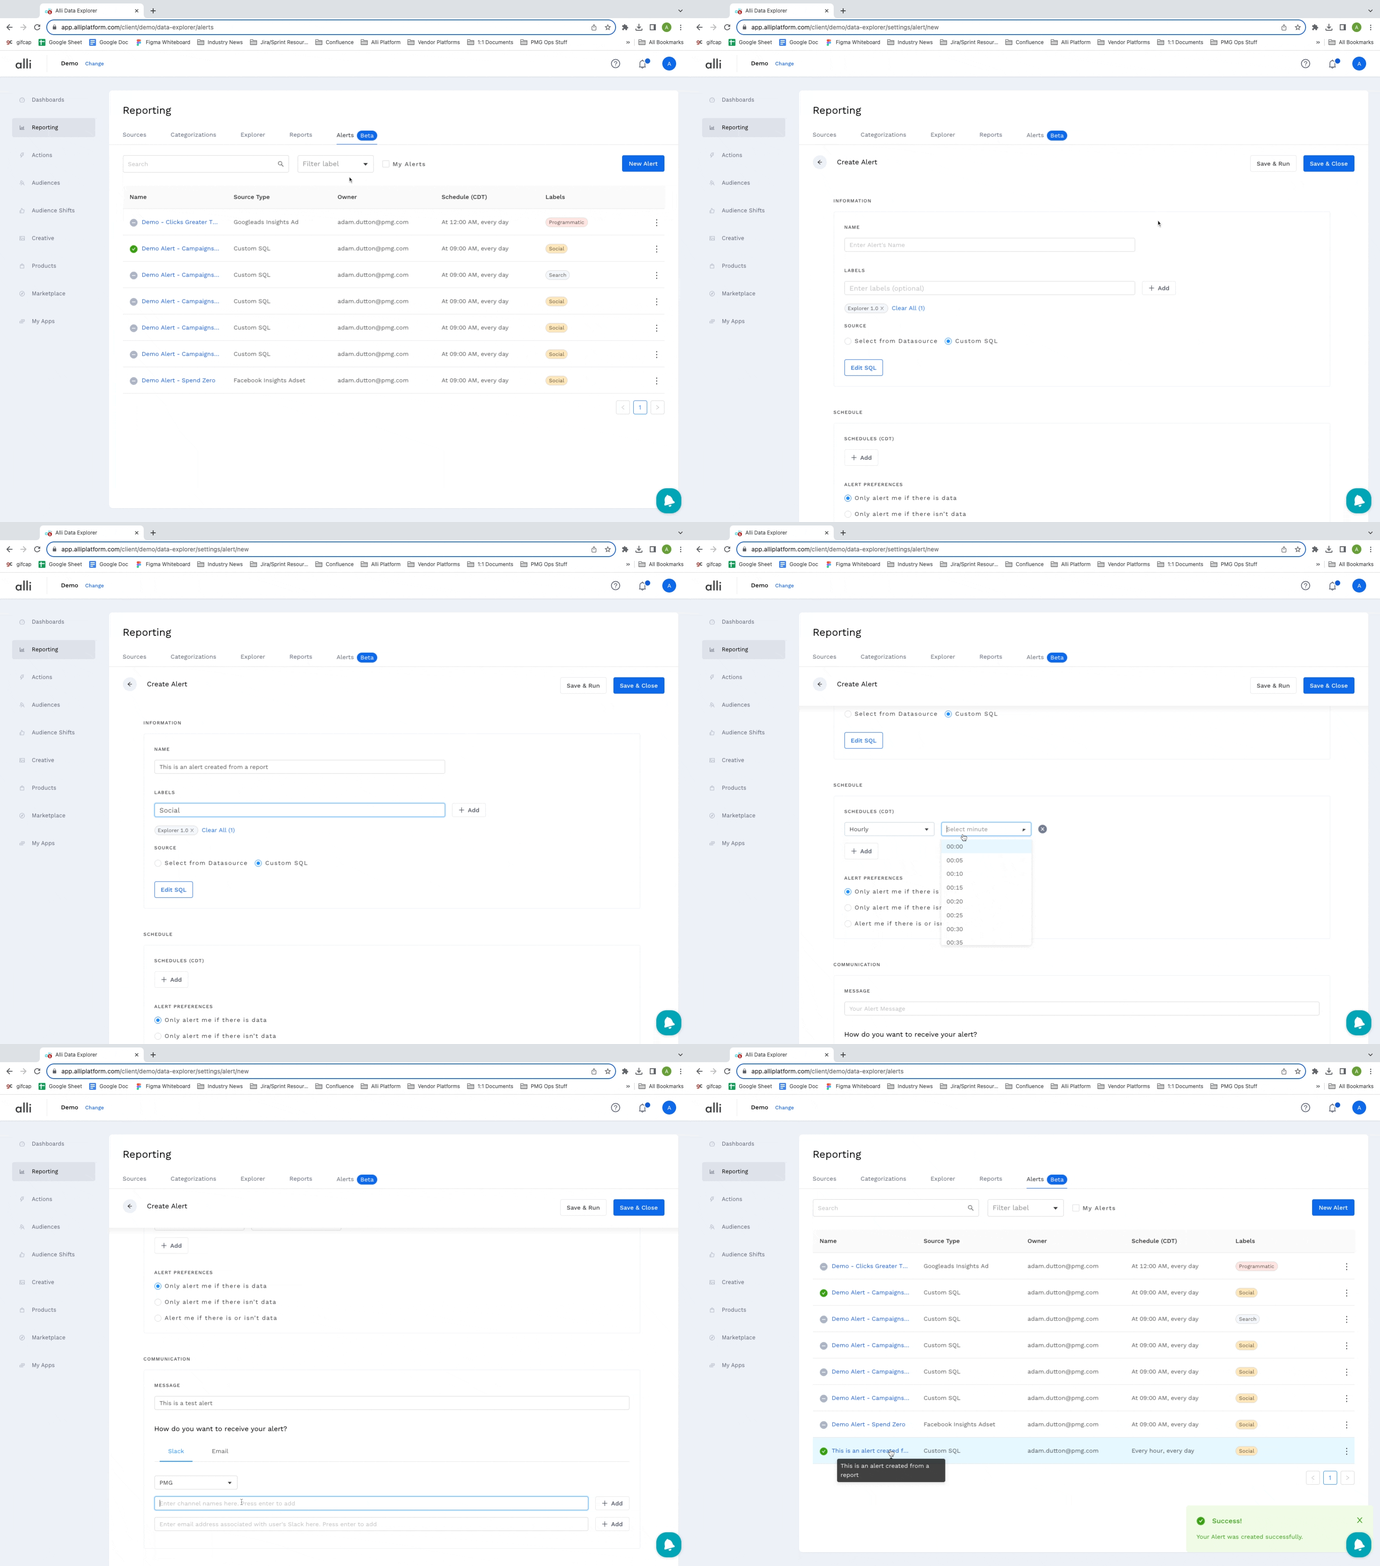
To create an Alert from a report, navigate to Reports and select an existing report or create a new report. Once you are satisfied with your report setup, click the three-dot menu and select Create Alert. This will copy your data logic over to the Alert setup page. Here you can complete the Alert setup and save it as a new Alert.
The Report and Alert are not linked so making a change to your report will not impact the Alert. If you would like to make any adjustments to the data logic for the Alert, this will be handled by navigating to your existing Alert and selecting Set Data or Edit SQL.
Frequently Asked Questions
Can I send an Alert to a private channel in Slack?
Yes. To allow for this to happen, you must invite the Alli bot to your private channel. This can be done by typing /invite @alli in your Slack channel.
Can I send an Alert to someone without an Alli login?
Slack Alerts can be sent to any Workplace that you have added for your client. However, to download the Alert file, an Alli login is required.
Email Alerts can be sent to any email and the Alert file will be delivered as an attachment with the Email for the recipient to download without an Alli login.
Can I create an Explorer Alert from a view I created in Big Query?
No, this is not yet supported.
Can I bundle my Explorer Alerts to be sent at the same time?
No, this is not yet supported.
Can I send an Alert to Slack and Email at the same time?
Yes! Input information for both Slack and Email in the Communication section.
Can I Send an Alert to multiple Slack Channels?
Yes! Add as many channels as you need.
How do I know if I should use the Select from Datasource or Custom SQL option?
The no-SQL report builder currently has limited capabilities and will not work for dynamic date filtering, time period comparisons, or calculated columns. If you need to build Alerts leveraging these types of functions you will need to use the Custom SQL option.
What is the maximum amount of data rows that can be sent with an Alert?
5,000 - If more are included in the query, only the first 5,000 will come through.
How do I get a table to show up in my Slack notification?
Your Slack alert will by default include a tabular view of the query data as long as the number of rows does not exceed 8 and the rows themselves do not exceed 80 characters in width. Alert data that exceeds either of these limits will wrap and break the display so those alerts will not include a table.
